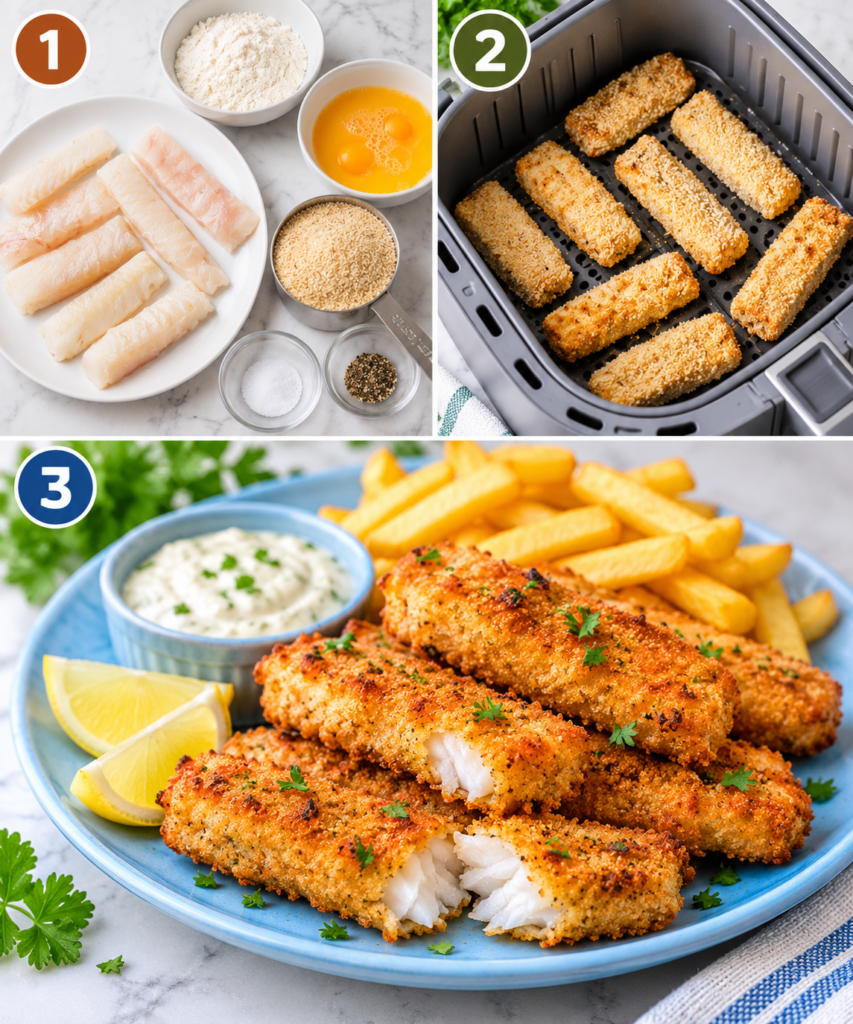


Homemade Fish Fingers are crispy on the outside, tender and flaky on the inside, and incredibly easy to make. Coated in a golden, crunchy breadcrumb mixture and cooked until perfectly crisp, they are a delicious alternative to shop-bought fish fingers.
This easy recipe uses simple ingredients and fresh white fish to create a family-friendly meal that both adults and children will enjoy. You can bake them in the oven, fry them in a pan, or cook them in the air fryer for a lighter option with less oil.
Making fish fingers at home also gives you complete control over the ingredients, seasoning, and portion sizes. Serve them with homemade chips, peas, coleslaw, or tartar sauce for a classic fish finger dinner.
What Type of Fish to Use
The best fish for homemade fish fingers is a firm, mild-flavoured white fish that holds its shape when cut into strips and cooked.
Here are some excellent options:
- Cod: One of the most popular choices. It has a mild flavour, flaky texture, and thick fillets that are easy to cut into fish fingers.
- Haddock: Another excellent option with a slightly sweeter flavour and firm, flaky flesh. It works particularly well for traditional British-style fish fingers.
- Pollock: An affordable alternative to cod and haddock. It has a mild taste and works well with crispy breadcrumbs.
- Hake: A delicious white fish with delicate, tender flesh. Choose thicker fillets so the fingers are easier to handle.
- Tilapia: Widely available and budget-friendly, with a mild flavour that works well with different seasonings.
My recommendation: Cod or haddock are excellent choices for homemade fish fingers. They have a mild taste, making them perfect for children and anyone who prefers a traditional fish finger flavour.
For the best results, use boneless, skinless fillets. If using frozen fish, thaw it completely in the refrigerator and pat it very dry before cutting and breading.
Ingredients for Breading
The secret to crispy homemade fish fingers is a simple three-step breading process. You will need three shallow bowls to prepare the coating.
1. Plain flour
Plain all-purpose flour creates the first coating and helps the egg mixture stick to the fish. You only need a light layer.
2. Eggs
Beaten eggs act as the binding layer between the flour and breadcrumbs. They help the coating stay attached while cooking.
3. Breadcrumbs
Panko breadcrumbs are my favourite choice because they create a light, crunchy coating. Regular dried breadcrumbs also work if you prefer a finer, more traditional texture.
4. Oil
A little olive oil or cooking spray helps the breadcrumbs turn golden and crispy, especially when cooking the fish fingers in the air fryer or oven.
Spices and Seasoning
A little seasoning makes a big difference to the flavour of homemade fish fingers. You can keep things simple or add your favourite herbs and spices.
Here is a delicious seasoning combination:
- Salt: Enhances the natural flavour of the fish.
- Black pepper: Adds mild warmth and balances the other seasonings.
- Garlic powder: Gives the breadcrumb coating a savoury flavour.
- Paprika: Adds colour and a gentle smoky flavour. Smoked paprika is also a great option.
- Dried parsley: Provides a mild herbal flavour and works beautifully with white fish.
- Lemon zest (optional): Adds a fresh citrus note that complements the fish.
Mix the seasonings directly into the breadcrumbs before coating the fish. This helps distribute the flavour evenly across every fish finger.
You can also add a pinch of cayenne pepper or chilli powder if you prefer a slightly spicy coating.
Breading Process
Before cooking, it’s important to coat each piece of fish properly. The three-step breading method helps create a crunchy coating that stays attached during cooking.
Prepare three shallow bowls:
- First bowl – Flour: Add the plain flour and a little salt and black pepper.
- Second bowl – Egg: Beat the eggs until smooth.
- Third bowl – Breadcrumbs: Combine the panko breadcrumbs with garlic powder, paprika, dried parsley, and your chosen seasonings.
Follow these steps for each fish strip:
Step 1: Pat the fish dry with paper towels and cut it into evenly sized strips, approximately 1 inch wide and 3–4 inches long.
Step 2: Dip each fish strip into the flour, turning it to coat all sides. Shake off any excess flour.
Step 3: Dip the floured fish into the beaten egg, allowing any excess to drip back into the bowl.
Step 4: Transfer the fish to the seasoned breadcrumbs. Press gently so the breadcrumbs stick to every side.
Step 5: Place the coated fish fingers on a clean plate or baking tray, leaving a little space between each piece.
Step 6: For an extra-crispy coating, refrigerate the breaded fish fingers for approximately 10–15 minutes before cooking. This helps the coating set.
Avoid using the same utensils or hands for raw fish and cooked food. Wash your hands and work surfaces thoroughly after handling raw fish.
How to Make Homemade Fish Fingers
Once your fish fingers are breaded, you can cook them in the air fryer, oven, or a frying pan. The air fryer is a convenient option for achieving a crispy coating with less oil.
Air Fryer Method
Step 1: Preheat the air fryer
Preheat your air fryer to 400°F (200°C) for approximately 3 minutes, if your model requires preheating.
Step 2: Arrange the fish fingers
Lightly spray the air fryer basket with cooking oil. Arrange the breaded fish fingers in a single layer, leaving space between each piece.
Avoid overcrowding the basket. Cook in batches if necessary.
Step 3: Add a little oil
Lightly spray the tops of the fish fingers with cooking oil. This helps the breadcrumbs turn golden and crispy.
Step 4: Air fry the fish fingers
Cook at 400°F (200°C) for approximately 8–12 minutes, turning them halfway through cooking.
The exact time depends on the thickness of the fish fingers and your air fryer model.
Step 5: Check that they are cooked
The breadcrumbs should be golden brown and crispy, while the fish should be opaque and flake easily with a fork.
Check the thickest part with a food thermometer. Fish should reach an internal temperature of 145°F (63°C).
Step 6: Serve and enjoy
Carefully remove the fish fingers from the air fryer and allow them to rest for a minute.
Serve immediately with lemon wedges, tartar sauce, ketchup, or your favourite dipping sauce.
Oven Method
If you don’t have an air fryer, you can bake the fish fingers in the oven.
- Preheat the oven to 425°F (220°C), or 200°C fan.
- Place the breaded fish fingers on a baking tray lined with parchment paper.
- Lightly spray or brush them with cooking oil.
- Bake for approximately 15–20 minutes, turning halfway through.
- Check that the coating is golden and the fish reaches 145°F (63°C) internally.
Cooking times will vary depending on the thickness of the fish.
Pan-Frying Method
For a traditional golden coating, you can also cook the fish fingers in a frying pan.
- Add a thin layer of vegetable oil to a large frying pan.
- Heat over medium heat until the oil is hot.
- Carefully add the fish fingers in a single layer.
- Cook for approximately 3–4 minutes per side, depending on their thickness.
- Transfer to a plate lined with paper towels to absorb excess oil.
- Check that the fish reaches an internal temperature of 145°F (63°C).
Avoid cooking too many pieces at once, as overcrowding can lower the oil temperature and make the coating less crispy.
How to Reheat
Homemade fish fingers are best enjoyed freshly cooked, but leftovers can be reheated easily.
Air fryer: Preheat the air fryer to 350°F (175°C). Place the fish fingers in a single layer and heat for approximately 3–5 minutes, turning halfway through. Make sure the centre reaches 165°F (74°C).
Oven: Preheat the oven to 350°F (175°C). Arrange the fish fingers on a baking tray and heat for approximately 8–10 minutes, or until hot throughout.
Microwave: Place the fish fingers on a microwave-safe plate and heat in short intervals until steaming hot. The coating will become softer, so the air fryer or oven is better if you want to keep them crispy.
Store leftover cooked fish fingers in an airtight container in the refrigerator within 2 hours of cooking. Keep at 40°F (4°C) or below and use within 3–4 days.
Freezer Tips
One of the best things about homemade fish fingers is that you can prepare a batch ahead of time and freeze them for quick meals.
How to Freeze Uncooked Fish Fingers
- Prepare and bread the fish fingers following the recipe instructions.
- Arrange them in a single layer on a parchment-lined baking tray.
- Place the tray in the freezer for approximately 1–2 hours, or until the fish fingers are firm.
- Transfer the frozen fish fingers to a freezer-safe bag or airtight container.
- Label the container with the date and store in the freezer.
For the best quality, use within 2–3 months.
How to Cook Frozen Fish Fingers in the Air Fryer
You can cook homemade fish fingers directly from frozen without thawing them first.
- Preheat the air fryer to 400°F (200°C), if required.
- Arrange the frozen fish fingers in a single layer in the basket.
- Lightly spray with cooking oil.
- Air fry for approximately 10–14 minutes, turning halfway through.
- Check that the centre reaches 145°F (63°C) before serving.
Thicker fish fingers may need additional cooking time, so always check the internal temperature.
Can You Freeze Cooked Fish Fingers?
Yes. Allow cooked fish fingers to cool, then freeze them in a suitable airtight container or freezer bag. Separate layers with parchment paper to prevent sticking.
For the best quality, use within 1–2 months. Reheat directly from frozen in the air fryer at 350°F (175°C) until hot throughout, checking that the centre reaches 165°F (74°C).
Freezer tip: Freeze the fish fingers individually before transferring them to a storage bag. This makes it easy to take out only the number you need for a quick lunch or dinner.
Air Fryer Fish Fingers

- Prep Time: 10 minutes
- Cook Time: 6 minutes
- Total Time: 16 minutes
- Yield: 10 1x
- Category: Main Dish
- Cuisine: American
Ingredients
- 1 lb white fish filets (tilapia or cod work well)
- ½ cup panko bread crumbs
- ½ cup parmesan cheese grated
- 1 teaspoon Italian seasoning
- ½ teaspoon garlic powder
- ½ teaspoon paprika
- ½ teaspoon black pepper
- ¼ teaspoon salt
- 2 tbsps oil (high heat oil like vegetable oil or avocado oil)
Optional Garnish:
- Tartar sauce
- Lemon wedges
Instructions
- Combine bread crumbs, parmesan, Italian seasoning, garlic powder, paprika and black pepper in a shallow dish.
- Pat fish dry and cut into 1-1½ inches wide pieces.
- Brush with oil.
- Gently roll fish in the seasoning dish so all sides are coated.
- Place fish on parchment paper.
- Cover fish with a second piece of parchment paper.
- Using your hands or a rolling pin, put gentle pressure on the fish to push the seasoning into the fish. It will stay on the fish better this way and less will fall off while cooking.
- Spray your air fryer cooking basket/tray with cooking spray to prevent fish from sticking.
- Place fish into the air fryer cooking basket/tray. Make sure there is space in between each piece of fish. Do not overcrowd the basket. You may need to cook the fish in batches.
- Cook at 400°F for 10-12 minutes. Cook time depends on the thickness and width of your fish pieces. Check on the fish intermittently. Internal temperature should be 145°F.
- Remove from the air fryer. Serve with tartar sauce and lemon wedges.
Notes
- Some air fryers have a pre-heat option. Preheating may reduce the cooking time a little bit.
- Air fryers need space between the food items to circulate and cook properly. Do not overcrowd your air fryer.
- You can substitute panko bread crumbs for Italian bread crumbs. Omit the Italian seasoning.
- If you have air fryer parchment paper (parchment paper with holes for air flow) you can cook your fish on that.